If you’re on this page, I’m sure you already know just how destructive moles can be. These little critters are digging machines that are capable of digging 18 feet in one hour! That’s why although they may be cute, we recommend taking care of your mole problem as soon as possible. The good news is with the right tools and a little knowledge, getting rid of moles is fairly easy.
When it comes to getting rid of moles, you have two main options, baiting of trapping. We typically recommend trapping, but if you want to see all your options you can check out our review on how to get rid of moles in your yard here. On this page, we will be covering the best mole traps on the market and exactly how to set them to maximize effectiveness!
Sings of Moles

Moles are active on and off throughout the day, sleeping and working in around 4-hour shifts. They spend most of their time underground, so often the signs of moles are much more obvious than the moles themselves.
While burrowing, moles often produce mounds and ridges disfigure lawns and can even dislodge plants and damage their roots.
Moles produce two types of tunnels:
Subsurface tunnels
Are feeding tunnels located just below the surface of the ground. These types of tunnels often result in raised ridges through lawn areas. Moles can extend these tunnels up to 100 feet per day. Along with using these tunnels to feed, they are also used to connect the next type of tunnel.
Deep Tunnels
Are typically between 3 and 12 inches below the ground surface. These are the main tunnels moles use to travel from their nest. The soil excavated from these tunnels is often visible above ground and leaves a symmetrical mound that almost looks like a volcano.
Tunnel Systems
Are made up of both subsurface and deep tunnels
Note: The number of mounds and tunnels on a property cannot be used to determine the size of a mole infestation. This is because a single mole can produce up to 12 mounds in a single week. So it’s not common for homeowners to think their mole infestation is much worse than it actually is. Typically, one acre of land can support one to three moles at a time.
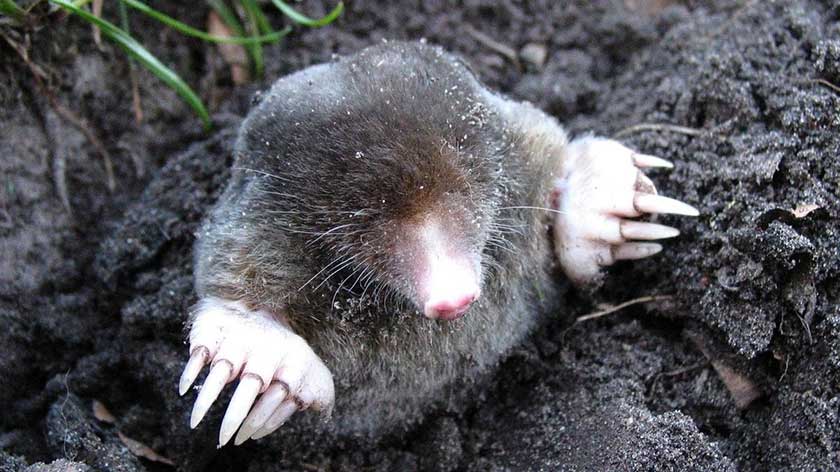
What do Moles look like?

Moles weigh 3 to 6 ounces and are about 5 to 8 inches in length. They have a tube-shaped body with dark, thick fur and small ears and eyes. They have pointed snouts, large rounded front feet with claws, and a short almost naked tail. Their velvety fur is typically grey or silverfish. They do have small eyes, although they are usually concealed beneath the fur and hard to make out. They are insectivores that spend most of their time underground digging tunnels for food or nesting purposes.
Why Moles Can be Problematic
Damage to one’s lawn from moles happens in many ways. The grassroots may be separated from the soil, which is why the ground may feel very soft when walked on.
By having the roots separated from the soil, the grass often dies. Also, the rain will not be able to properly drain due to the holes. Another problem is that other animals like mice and chipmunks will use it, causing a possible infestation.
Not only do they make a lawn look bad, but the holes are also very dangerous. They allow one to easily trip and fall causing a potential sprain or broken ankle. Moles are one of the most common types of pests in America, but thanks to mole traps they do not have to live in a person’s lawn for long. Now that we understand how moles work and why it is important to get rid of them, let’s look at traps used to kill and eliminate the problem.
Types of Mole Traps
The most effective way to get rid of moles is through lethal traps. Poisons and repellents are solid, but we find they are not nearly as effective as traps. Many homeowners try flooding the holes, but they either produce further damage to their property or the moles leave and create new tunnels, making their problem even worse. Lethal traps include spear/plunger traps, body clamp traps, and scissor traps.
Once one finds the trap to use two actions can take place. One is to dig large holes that expose the tunnels and set up the traps. The other action is to create small openings on the surface of the tunnel and use traps with long reaches to penetrate the tunnel. Many agree that it is more effective to use traps that penetrate the tunnel since it causes less damage to the lawn.
Lets now look at the different types of trap one can use to illuminate moles.
Spear/plunger
Spear/plunger traps are set on top of an active tunnel with the trigger pan against the dirt. The metal legs straddle the tunnel, where one leg is parallel with the trap so the trap can be placed against a flat surface. When the mole passes through the tunnel it will cause the trigger pan to push up, thus slamming the spears down and killing the mole.
Body clamp
Body clamp traps are placed inside the tunnel under the ground, and many are often placed right next to each other facing outward back-to-back. When the mole crawls through the tunnel it will hit a pin, allowing the pin to slip and slam the mole. This will make the mole die quickly.
Scissor traps
Scissor traps like the others are placed on active tunnels created by the mole. When the mole crawls through the tunnel it causes the blades to snap together, killing the mole. This is the easiest and most popular of the three types of traps to use because of how simple the design is. This trap can be seen and monitored from farther away, making it easy to know if it has worked or not. Below are the best mole traps for each of the three different types of traps: scissor, clamp, and spear/plunger traps.
Here Are the Best Mole Traps – Updated to 2023
1. WireTek Easy Set Mole Eliminator (Scissor Trap)
This WireTek scissor trap is the worst nightmare for moles. Although it is a little more expensive than others on the list, we recommend using the “buy once, cry once” mentality and picking up this trap to ensure you don’t have to spend time and money down the road still dealing with your mole problem.
This trap is the only device that can be set into a mole tunnel without digging, placing cables that can be dangerous, or putting down spears or clamps. It also has safety measures to ensure pets and children are not harmed. It is one of the easiest tools to use to capture a mole, and it is currently the most effective method on the market to capture moles. To set up the trap, place it into the dirt of a straight tunnel with gloves on ensuring no scents are put onto the device. Once the trap is placed in a hole, step on the trap to pull the jaws apart. While your foot is still on the trap rock it back and forth to really get the trap into the tunnel and allow dirt to fill in around it. This ensures that the jaws will not get bound up.
When the mole goes through the tunnel it will activate the scissors, snapping the mole.
Key Takeaways for WireTek Scissor Trap
It is made with 100% galvanized steel that can work in all soil types, including loamy and sandy soil. The scissor trap comes with a user manual and a 1-year warranty. It is important to make sure that the nuts on the side of the trap are not too tight. The spring should not have a hard time closing shut, and some can be delivered like this so they do not spring while in transport or when opened. If your nuts are turned too tight you can loosen it one to two full turns. It is also important to remember that this trap does not have a hair-trigger.
If you’re serious about ending your mole problem at any price, this is the trap for you. This trap is a true (buy one, cry once) purchase that will not disappoint. The installment is easy, making it great for someone who does not have experience with mole traps. All one needs to do is locate the tunnel and set it up with the base placed on the soil and stepping on the lever. Because this device is made of great material and has a warranty, it should last more than a few years.
These traps can be used consistently over many years. Because the device does not have sharp edges or spears it is a great contender for those with pets and children. The downer with this device is the price. It is one of the priciest mole trappers on the market, currently going for $70 on Amazon. Overall if a tight budget is not a concern this device is recommended.
Key features include being easy to set up, no digging, made with durable metal, fast spring action, and is approved for organic farms and nurseries.
2. Aspectek Mole Trap Gopher Trap East Set Eliminator (Scissor Trap)
The Aspect mole an gopher trap is a scissor trap that worse beneath the surface. This device works on gophers as well as moles and is made of sturdy galvanized steel to last through different types of weather. It has large, scissor jaws used as traps. To use the device, place the trap in the center of a tunnel until the base of the trap touches then ground. Once this is done, step on the trap straight down with the foot on the setting lever, which is the lower lever. When the mole comes into contact with the trap, the trigger will be pushed and scissors will cut the mole.
Key Takeaways for Aspectek Mole Trap
This is a great trap to choose if you want one that works well but cost less than other scissor traps. With this trap, people remember that they are not paying for a mole trap, but for dead moles. It’s not uncommon for moles to get trapped within hours. That said, it still does not work as well as the WireTek Easy Set Mole Eliminator due to the WireTek having lots of metal surface area while the Aspectek has bent steel rods. This should not be a surprise given that the Aspectek Mole Trap Gopher Trap East Set Eliminator is about a third the price. Overall if someone wants a device similar to the WireTek but does not want to pay that price this is a great device to get. This is currently getting sold on Amazon for $30.
The pros are that it is placed completely underground so pets cannot be hurt, only needs one step to work, requires no digging and is made with a durable metal. Cons are that is has to be
3. Tomcat Pro Grade Mole Trap
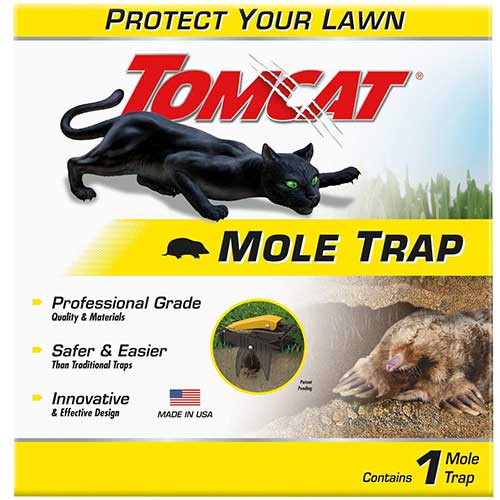
The Tomcat professional grade mole trap is made of plastic and is easy to set. Although this trap does not look like the others with its strong plastic material and colorful design, this trap is also very effective. Because it is made of plastic there are no sharp edges, making it safe to use around children and pets. The device relies on dual-spring action to immediately kill the mole with lots of pressure. Although this is built of plastic it is meant to last for years. It is technically made out of nylon, which is a tough, resistant form of plastic. This trap is easier to use compared to others, and at a cheaper price, it is a win for humans and a loss for the moles. One can increase their chances of catching a mole with this device by relocating it every 12-24 hours.
Key Takeaways for Tomcat Mole Trap
We find that this traps trap is not as durable as others on this list because it is made of plastic. It is important to note first that this is the cheapest of all three scissor options, costing just $18 compared to over $30 for the Aspectek and over $70 for the WireTek. Many have stated how well the quality is on the device, however, saying it has lasted for years. In the end, there are a lot of variables that could go into why a trap breaks. If you do want to risk it you should get a metal trap.
The pros are that this trap is built well, the yellow color of the trap can be seen from some distance, and can be used over and over again. Cons are that it does not work on tall grassy areas, the plastic could break, and has to be moved often to increase affectivity.
4. Cinch Mole Trap (Body Clamp)
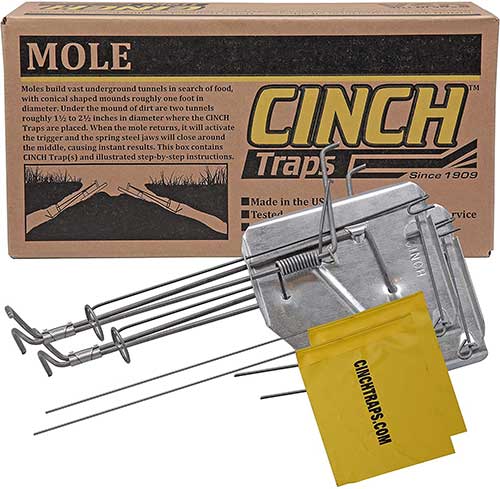
A clinch trap is another way to catch moles beneath the surface. Moles are sensitive to iron, so it is important to find a trap with no iron in it. This trap does just that. The cinch mole trap has a long reach and can easily hide the jaws with loose dirt. To place the trap, find an active tunnel. Then put extra soil around the holes and insert a trap at both ends. To place it correctly, one should find a decent size hole so that the trap is placed in the right vertical and horizontal level. The jaws are several inches, ensuring that it captures and kills the mole. Overall the cinch mole trap is easy to set up and put in the tunnels.
Key Takeaways for Cinch Mole Trap
At under $30, this is not a bad deal for the trap. On the downside, it only comes with one trap when normally one needs multiple traps to kill a mole. Even though the price is higher than others, there are many good reviews due to it working well and lasting for multiple rounds. This is a great choice, but perhaps not the best out of the group if you are looking to have multiple traps around your yard.
The pros are that this is a longer vertical trap, has extended safety features, and is bigger than the average trap. Cons are that the instructions are confusing and could be difficult to learn to set properly.
5. Nash Choker Loop Mole Trap (Body Clamp)
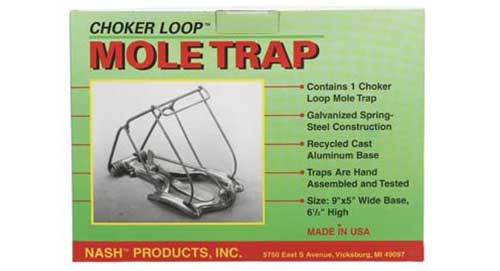
The Nash Coker loop trap is not as popular as scissor traps but is an effective way to catch moles. This is an older trap compared to the others, but it still has a high rating due to how it performs. This trap is one of the most durable traps on the market, made of galvanized steel to protect against rust and weathering with an aluminum base to offer easy spring action. Without any sharp edges, this is a great option for those with children and pets.
The price of the trap is is reasonable. To use, find an active tunnel and cut two vertical holes on both sides of the tunnel. Two slots then go into the ground to fit in the trap’s wire loop. Put the spades in the holes and then lower the trap to rest on top of the tunnel. Finally, collapse the ground where the trap is located. Because there are no safety pins one must be careful during this part. The safest way to do this is to step on the trap.
Key Takeaways for Nash Choker Loop Trap
Although this can be a difficult trap to work with, your work will pay off in the long run given its long history of success. However, this is the lack of safety pins. Placing the trap without safety pins means there is a risk of injury. Because there are no spears or barbs, though, the worst that could happen is a bruised hand or foot being caught in the loops of the trap. Because this one is in the list after being on the market far longer then any other trap shows how well this tool performs. Even though it is not as popular as newer models like the Tomcat or WireTek, the Nash Choker Loop trap offers an alternative with a simple layout. At $15 this is an excellently priced trap.
The pros are this is a design some people are already familiar with. Cons are that is can be hard to set up and lacks a safety pin.
6. Victor Out O-Sight Mole Trap (Body Clamp)
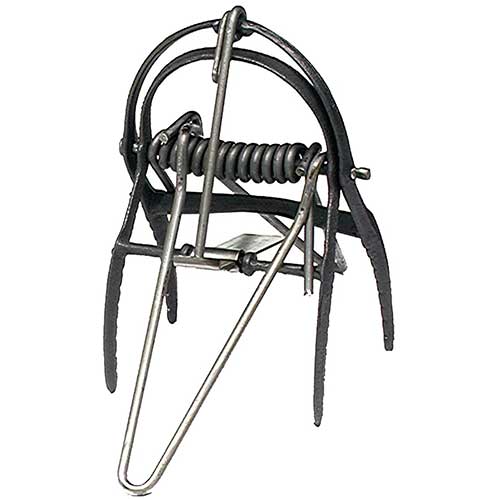
This Victor Out O-Sight Mole Trap has iron “jaws” that chokes the mole to death. The trap should be placed in a tunnel and covered with dirt to lure the mole. The mole will want to re-open the hole and become trapped in the process. This device is perfect for people who want a sturdy and reliable trap. It is made out of durable and weather-resistant metal to allow reuse for years. Setting levers are included with a safety clip. To set up, the clamps will be trapped together on the top handles using a tong; the bottom half remains open giving it a jaw-like look. A trigger is attached to the trap, and when the mole touches it the trap will shut and clamp onto the mole. Tools are provided in the box to help with leverage.
Key Takeaways for O-sight Mole Trap
Many consider this trap the one of the only trap they trust and use because of how well it works and how long it has lasted. This is one of the best body clamps because of its material and ability to work in any soil, unlike other traps. This is a very reasonably priced trap, making it perfect for those that want a cheap fix to their lawn problem. The device does it exactly as it states it stays out of sight and is hidden in plain sight. Although it is hard to set up because it is stiff, additional setup is not required. Because of this, it can be a good choice for first-timers. This device goes for $11, making it an excellent choice and a very good price.
The pros are this trap is that it comes fully assembled, works in any soil, is ideal for sandy soil, and comes with a safety clip. Cons are that it is stiff and can be difficult to set, instructions are not clear, and it can not be seen from far away to know if it has trapped a mole.
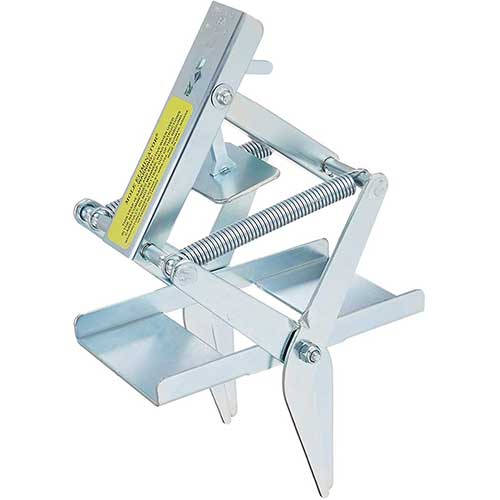
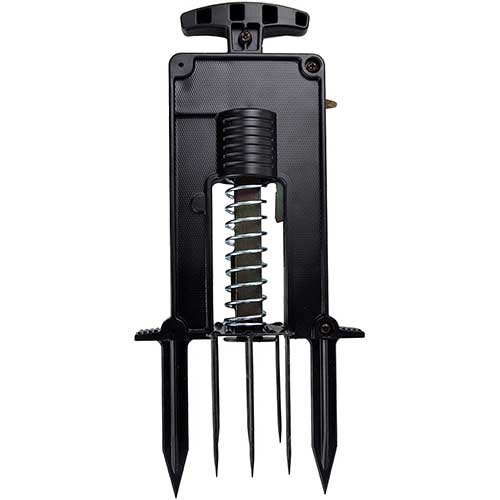
7. Victor Plunger Style Mole Trap (Spear Trap)
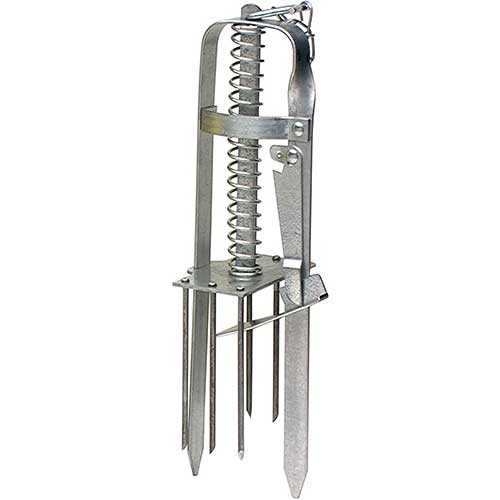
This Victor plunger style mole trap is made with weather-resistance material. It is referred to some as a harpoon trap, is perfect for those in areas with severe weather changes. It is made from corrosion-resistant steel, where it can be placed in the ground for months without rusting. The mole trap is placed in a straight tunnel with the trigger on the blockage of a hole; forcing it into the surface of a tunnel does this. The mole will come to re-open the hole and get trapped in the process by pushing up on the trigger. The steal trap takes the shape of a plunger with spears on multiple sides on the end meant to kill the mole at first impact.
Designed with a safety pin, it makes it safe to use around pets and children. If the device is installed correctly many consider it the safest to use around children and pets because the spears are designed to only push down instead of to the sides. It also comes with a safety feature that prevents the trap from going off during setup. Although it may be older then other traps, it is easier to clean between sets due to its design. It has huge gaps between the spears for easy access.
To use the trap, use your hands and feet to push down on the grass above the middle of an active tunnel. You can then set the trap by pulling at the handle spring at the top of the trap and forcing the small level to hold the trap in place. Make sure that the trap is up enough to catch the trigger. When the mole comes through the tunnel the trap will release the arm trigger, pushing the spear into the mole.
Key Takeaways for Victor Spear Trap
People from 50 years ago have recognized this tool. This shows how long it has been around and thus showing how long it has been successful since it is still on the market today. It has a classic design that has shown to work again and again for years. At only $17 it is an amazing deal. Because it is very cheap though it is no surprise that there are some shortcomings. It is hard to set up due to its stiffness. Even though no assembly is required and a manual is provided it can still be difficult to be placed correctly.
Another issue is that it does not work well with soft and sandy soil. This means that certain areas of the country would find it difficult to use. Even though it is difficult, it does not make it impossible. You would have to find a way to keep the trap in the ground. One way to accomplish this is to drill holes on the trap’s arm and put strings on it and tie it down with stakes. Overall it is a good trap, but perhaps not the best.
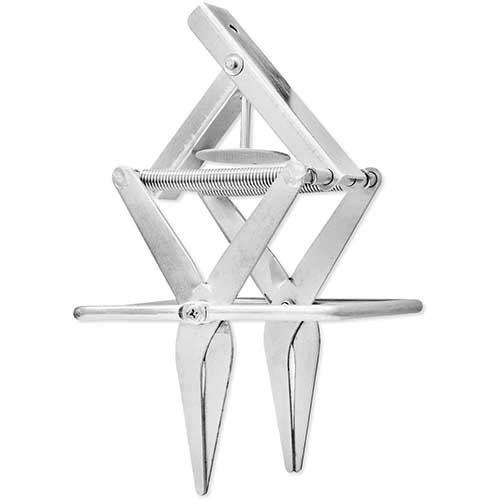
8. Sweeney’s S9015 Deadset Mole Trap (Spear Trap)
Able to detect the slightest movement, the Sweeneys deadset mole trap will strike and kill with spears that are pushed into the ground killing the mole. The device comes with an easy handle grip and has an oversized activator plate that is pushed into the ground with the help of the hand or foot. It comes pre-assembled, making it easy for first-timers to use quickly. The trap is pushed into the ground above an active tunnel, allowing easy and quick set up. Water the ground after setting the trap to bring worms, the food source of moles, close to the surface. Ensure that the trap is out of the way of roots or rocks right below the surface. Once movement is detected underground the spear trusts into the ground.
Key Takeaways for Sweeneys Spear Trap
Anyone who has ever struggled with setting up a mole trap will appreciate this design since it comes assembled and ready to use. For only $20 this is a great deal. However, there are some cons that we should discuss. The ground spikes are made of plastic, so unlike the high-quality metal competitors, this one could break. People have reported having it for only a few months when they had to relocate it to another tunnel and it has snapped after trying to put the trap in its place. This could happen from plastic fatigue, weak points of something else. However, it is cheaper than others so that will be one thing to think about.
The pros are this is a patented design and triggers to the slightest movement. Cons are that it has short legs, so the mole tunnel needs to be right below the surface. It is made of corrosion resistant plastic which is good but the plastic trap is not as strong as metal traps.
Related Article: How to Get Rid of Moles in the Yard
9. JT Eaten Mechanical Mole Trap-490 (Spear Trap)

This JT Eaton mechanical mole trap is similar to the other two spear/plunger traps described above. Made with rust-resistant steel, the six spears have harpoons causing instant death to moles with a powerful spring. This type of trap is recommended for golf clubs, country clubs, parks, farms, cemeteries, and schools due to its design and what landscape it works with.
Key Takeaways for JT Eaten Spear Trap
At under $20 this is one of the cheapest options to use. It can be hard to set up because of how stiff it is and because the trigger mechanism is not as good as the other traps. High ratings show that it traps animals fast, but it is not a trap for beginners or those that are not strong to use because of how much effort it takes to get it positioned right into the tunnel. One of the benefits is that this comes with six traps, so mathematically this is by far the cheapest trap out of the list, which is great for those that are on a tight budget. This trap does not work well in sandy soil.
Related Article: 17 Best Ways to Get Rid of Rats
Tips When Trapping Moles
There are many tips to help you be successful at trapping moles. Here are 5 of the biggest.
1. Trap Placement
The problem many people will face is the placement of the trap because it has to be placed just right in order to work. Most instructions are hard to understand or are too vague. The best place to set up a trap is on a tunnel that is straight, is against an edge (like a house), and is the most active and permanent.
To ensure proper placement one must observe and be persistent. Moles have evolved to be very smart around humans, so we must think of ways to outsmart them. One way is through trap density. This means placing traps in different conditions.
To find active tunnels look for constant reopened tunnels that connect multiple mounds. Many active tunnels will follow man-made objects, like walkways and fencerows. Once you have found an active tunnel probe at the mounds until you feel a sink in the ground. This is where you will place the trap.
2. Season To Trap Moles
Another huge player is the season you set out the mole traps. Unlike other animals like chipmunks, moles do not hibernate. Instead of hibernating, moles create deeper tunnels during the winter. They also build deeper nests during the summer to escape the heat from the sun. It is because of this that during the summer and winter it is harder to trap moles.
The spring and fall are seasons that more people see moles in their yard because it is not too hot or cold for moles to be deep underground to escape the weather. It is during the fall and spring that tunnels are close to the ground, making it easier to trap them. Populations are also lower in the fall and spring. One should take care of their lawn before the grass grows too long at the end of spring or leaves fall in the fall to more easily see possible tunnels from moles. If you trap in the spring you could prevent future babies from joining the party in your backyard.
3. Wear Gloves When Trapping Moles
Another tip a lot of people do not think about is wearing gloves. Moles hunt for food using their sent. They have powerful noses, and the human’s scent is very strong for moles. They can detect our scent right away and not go near the trap. By wearing gloves the scent is masked. It will also be important to wear gloves when you come back to take your trap out. A mole corpse might be there, making it important to wear gloves to reduce spreading disease or microorganisms.
4. Clean Mole Traps
It is very important to deep clean your traps. This will ensure that no orders are present for future kills. You should clean your trap as soon as you buy it if you have touched it, and after a mole has been caught. You want your trap to smell like the mole’s environment, which is dirt. Rubbing dirt on the trap where a mole has not been around can do this after washing it.
5. Irrigate the soil
One should irrigate their soil before setting a trap. Through irrigation and watering the lawn worms will gather at the surface of the ground, which will then cause moles to come to the surface to feast. This will make trapping moles even easier.
Related Article: 12 Best Squirrel Proof Bird Feeders
Common Mistakes When Trapping Moles
People, especially beginners, can make lots of mistakes with setting traps. Here are a few
1. Trap Placement
Traps do not go at the ends of the tunnel, but inside one of the mounds, they have created! When people place their traps they might leave the trigger pan above a tunnel, meaning a mole could easily wiggle below it and not get trapped. The point of a trigger pan is to snap if there is a blockage in a tunnel, like a mole trying to go through. This is the biggest common mistake.
2. Wrong Tunnels
Along with placing traps at the ends of tunnels, another big common mistake is placing the traps in the wrong tunnels. The instructions of any trap will state to place it in an active tunnel. If there is a long, active trail one can tell by feeling the soft ground. An instant thought might be to crush several parts of this tunnel with a device or your foot, but that’s a big mistake because the mole could make deeper tunnels that you cannot penetrate.
To ensure you do not make this mistake you need to pick the best active tunnel. The tunnel should not be too deep where your trap does not penetrate the tunnel and it should not be opened with a tool such as a shovel. The active tunnel should be a few inches wide. You should also look to see how many holes are in a tunnel. If there is just one hole could be just a hole, so do not place a trap there. If you want to test out of a hole is just a hole or a tunnel for a mole fill it with soil and see if it is reopened after a day or two.
3. Mole Mounds
It is important to remember you only trap tunnels and not mole mounds. This is a waste of time because it will just be dirt you catch in your trap.
4. Check Traps
If one gets a spear trap one common mistake they can make is not knowing when they have caught a dead mole. They can go out and take out the trap just to see no mole present. To ensure there is a mole, before pulling the trap dig both sides around the spear to see if there is a dead mole below the spikes. It is hard to see if a dead mole is caught due to the design of the trap.
5. Number of Mole Traps
Another common mistake is not using enough traps. If there are four active tunnels, then one should use four traps. In the end, it could be cheaper once considering the damage the mole could create and the time put into trapping the mole.
6. Lawn Maintenance
Another mistake many make involves lawn maintenance By keeping the lawn mowed short and trimmed well it will make it easier to see new tunnels. Therefore it is important to not have the grass grow too long. One should also not put sod or topsoil over the tunnels. This is a mistake because it will create another layer to the tunnel system and will make it harder to stop tunnels.
Conclusion on Mole Traps
Well, there it is. We have talked about what moles are, the different types of mole traps, the best mole traps, tips to trap, and common mistakes people make when trapping their backyard. Overall, there are many traps that have great reviews, but many overall agree that scissor traps are the best options because of how easy they are to set up. The best-rated scissor trap and trap overall is the WireTek Easy Set Mole Eliminator.
It is the easiest for people to use and has the highest rate for killing moles. Even though it is on the more expensive side for traps, it meets its requirements and goes beyond what it says. In the end, you don’t want to risk and play around with moles, because they can cause serious damage to your property and not care about the results. It is important to get ahead of the game to ensure you win the war on moles!
Related Article: How to Get Rid of Groundhogs
My name is Blane and I’m a life-long resident of Southeastern Louisiana. I’ve been working as Pest Control Technician and Inspector for about 1.5 years now.
I’ve worked in many other industries as well, including consulting, managing, as well as at the ground level in fields including Food Service, Corporate Automotive sales, and finance. Whether it be providing counsel, content, or hands-on support; my goal remains to add value to the lives of the people I serve.
If you have any questions regarding pest control, leave them below. I would be happy to help you out in any way I can.
Blane, thank you for all your information. We live in Northern California. We have been fighting moles for the last several years. We purchased the Wireteck trap you recommended. We are using all your tips and hope to get rid of them. Although we do have moles in our yard our biggest problem is some landscaped sloped areas that they are winning the war. We know their main tunnel is along the garden wall. We cannot set the trap parallel to the wall because the scissors run 90 degrees opposite of the wall. Any suggestions? We are following your tips. Our moles make no mounds and we know they are moles as we caught one with a pitchfork last year. Thank you for anything you can suggest.