In this post, I’ll go over the 6 best moles traps. So you can finally get your home back from these pesky rodents.
Let’s dive in!
1.Wire Tek 1001 EasySet Mole Eliminator – Easiest To Use
Pros
 Easy to set – no hands required – set with foot
Trap is tucked away safely underground
No ground preparation
No bait required
No poisons or hazardous chemicals
Environmentally friendly
Reusable
All metal heavy-duty build
Cons
 Expensive
Difficult to use on loose ground or dirt
Takes time – since there is no bait
Sharp ends on these products can cause safety concerns
Cleaning scissors and disposing of mole can be dangerous
Key Details
- Above or underground: Underground
- Materials: Alloy Steel
- How Long Does It Last: Unlimited one year home use
- Type of Trap: Scissor Trap
How To Apply It?
For the best results, follow the steps below:
- Protect yourself: wear a pair of gloves and shoes before you start setting the traps.
- Locate mole tunnels in your yard.
- Mole tunnels will appear as:
- Ridges
- Dirt paths
- Holes in the ground
- Mole tunnels will appear as:
- Once you locate the tunnels – insert the closed trap into the center of the tunnel. Insert the trap until the base of the trap is flush with the ground.
- Step on the lever of the trap until it is completely flat.
- Once the lever is flat, your trap is set.
Important Application Notes:
- Always make sure the trap is inserted below the ground.
- Avoid placing traps near plants or trees. The roots of plants and trees can make it difficult to set the trap.
- Before moving the trap to a different location, you must set it off. You can set it off by removing it from the ground and dropping it. This will usually cause the trap to go off. Be sure to keep your feet in the clear when dropping it.
How Does It Work?
The idea behind the Wire Tek 10001 is very simple. The scissor mechanism is placed under the ground.
The trap needs to be placed along a mole tunnel.
When the mole passes through the tunnel, the trap is triggered, and the scissors clamp around the mole’s body.
The trap has sets of scissors that are parallel to one another.
This will cover any direction that the mole can come from.
This trap requires digging or bait when setting up.
It does require that the mole naturally go through the tunnel and activate the trap.
So how do you know once a trap has been activated?
When a trap has been triggered, the trap base will be elevated and off the ground.
What I Like
Easy to Use
The best part is that it’s easy to use and very safe.
First, you can essentially set the trap without using your hands.
Once inserted into the dirt, the trap can be completely set with your foot.
There are no exposed parts to this trap, so you don’t have to worry about getting caught on the trap or someone accidentally stepping on it.
Durable and Reusable
I also like how this trap is durable and reusable. This trap is made out of all metal.
You don’t have to work about your trap breaking or being susceptible to the elements.
This trap is made to last, and there is no doubt that you will do this.
What I Dislike
Too Much Uncertainty
My main issue with this trap is that there is no guarantee that the mole will go through the trap.
Since the trap doesn’t use any bait, there is a chance that you might be waiting a long time for it to work.
In some cases, if the moles have moved on to new tunnels, they may never come into contact with the trap.
Expensive
Compared with other traps, this one is quite expensive. It is important to note that this trap is made of all metal, so it will last.
With that said, you will likely need to buy multiple traps, which can get expensive.
Instant Kill
Although this trap is very efficient at catching moles when they try to pass through, unfortunately, the trap does not always provide an instant kill. In some cases, you will find a squirming mole when you remove the traps from the ground.
2. The Blackhole Rodent Trap
Pros
Reusable
Can trap more than moles
Effective spring mechanism
Easy to hide with dirt
Inexpensive
Easy to install
No special maintenance
Cons
You must deal with the live Gopher at the end
Gets clogged with dirt
Must be secured to the ground
Made of plastic – not durable
Key Details
- Type of Trap: Choke-type trap
- Above or underground: Underground
- Materials: Rugged plastic
- Exposed trap: Underground
- How Long Does It Last? Reusable
How To Apply It?
- First dig out the gopher hole and determine the direction.
- Create a flat surface to place the Black hole gopher trap.
- Press the spring down until its flush with the trap.
- Now lay the spring bar across the spring and insert it into the trigger.
- The trap is not set and ready to be placed.
- Once placed cover the trap lightly with durt.
- Make sure the end of the trap- with a small hole is exposed . This will encourage the gophers to enter the trap to try and seal the hole.
For the best results, locate fresh mole tunnels and mounds.
You can also place bait inside the hole at the end of the trap to attract gophers.
Its important to seal the gopher tunnel with the trap. This includes the sides and top of the trap. Only leave the vent hole exposed.
How Does It Work?
The black trap is a set of by a trigger when the gopher enters the trap.
The trigger sets of wire noose which captures the mole.
The noose does not allow mole to escape the trap.
The mole can be hurt by this trap but in most cases it is caught humanely and should be disposed of appropriately.
You can can release the mole by pushing the spring down until the noose loosens and the gophers falls out.
What I Like
Easy To Use
First these traps are super easy to use. Setting the trap takes about two steps.
Since the nose is located inside the base of the trap it will not hurt you.
Even if the trap does happen to go off with your hand inside the trap it does not hurt.
Humane
This trap is for the most part humane. The traps is not designed to kill the gophers.
It will trap them and then you can release them somewhere away from your home.
You don’t have to carry the heavy conscious of killing gophers.
Use on other garden pests
The trap is large and can handle other larger garden pests.
Also since the noose adjusts to the size of the animal regardless of the pests size it will not get out.
This is great as seasons change or if you find another pest in your yard.
You don’t have to worry about buying different traps to treat your yard.
What I Dislike
Plastic Build
The thing I don’t like about this trap is that the enclosure is made of plastic.
While the trap spring and noose are metal which will last if the base breaks you will have some serious issues.
Although the plastic is durable, dropping it and moving it around may cause it to break.
In fact a common accident is to hit it while you are cutting your grass.
This ofen breaks the back of the trap making it hard to use.
Large
Since this trap is large, you will need to dig a hole large enough for it to fit.
This means for some time you will have a large hole in your yard until you catch the gopher.
Other smaller traps allow you to minimize the damage to your yard by keeping the hole small.
Hard Spring
The spring can be a bit difficult to set at first due to how strong and sensitive it is.
While this can be frustrating for some, this is the reason the trap works so well.
Keep this in mind, if you have had trouble setting traps in the past.
3. Tomcat Mole Trap
Pros
Easy to set and place
Hands-free design
Weatherproof
Safe for kids and pets
Cons
Requires ground preparations
Mostly plastic – not as durable as other products
Time-consuming to set
Requires large, deep hole to set
Key Details
- Type of Trap: Mole trap
- Above or underground: Underground
- Materials: Plastic
- How Long Does It Last: A couple of years
How To Apply It?
Before you can set the trap, you need to find the active tunnels.
- Use a down or stick to puncture holes in the tunnels.
- After 24 hours, inspect the holes you made for an activity.
- Tunnels with the holes covered with dirt again indicate an active tunnel.
Once you find the active tunnels, it’s time to prepare the dirt.
- The first step is to create a 1’ indent for the trigger of the trap.
- To do this, you can use the depth gauge to confirm it is the correct size.
- Now use the jaws on the trap to mark each side of the initial indent made for the trigger.
- Finally, use a spade to create a 5” deep hole across the tunnel to insert the trap.
Once the trap is in place, it’s time to set the trap.
- First, make sure that the jaws on the trap slide into the slots you created earlier.
- Now, step down on the yellow foot pedal.
- Push the foot pedal down until the trigger post comes through the slot on the pedal.
- Finally, use your foot or finger to make the trigger post flush with the foot pedal.
After setting this trap, there are some important things you need to look out for.
- After setting, the trap should be flush with the ground.
- If the pedal does not go down with moderate pressure – remove the trap and clear out any debris inside the tunnel.
- Puncture a hole about 3-6” away from the trap on either side of the tunnel. If you don’t see any moles after one week and the holes are sealed, there is an issue with your trap placement.
How Does It Work?
Conceptually, the design of this product is the same as other mole traps.
The trap is placed flush with the ground, and scissors are placed on either side of the tunnel.
When a mole enters the tunnel, it will activate the trap causing the scissors to close on the mole.
What I Like
Safe
This trap is very safe. First, there are no sharp edges, which means you don’t have to worry about pricking yourself when removing or adding products to your list.
It’s easy to get rid of the mole after use.
Easy Setting
Once the trap is on the floor, it is easy to set up.
All you have to do is step on the yellow trigger until it is flush with the trap base.
There is no need to use your hands at any point.
What I Dislike
Extensive Preparation
Compared to other traps, this one requires extensive preparation to get it right. It takes much longer to set up than others.
Not to mention, it needs to be much more precise than the others as well.
Made of Plastic
Another big downside is that the Tomcat trap is made of plastic.
Whereas, other models of mole traps are mostly plastic.
This means that this product most likely won’t last as long as some of the other trips on the list.
4. Victor Out O’Sight Mole Trap
Pros
Reusable
Weather-resistant
Affordable
Does not require bait
Comes with Two Setting Tongs
Cons
Trap is hard to set at a sensitive level
Trap is stiff, which makes it hard to set
Poor instructions
No visual cues once the trap is activated.
Key Details
- Type of Trap: Plunger-style
- Above or underground: Underground
- Materials: Metal
- How Long Does It Last: Reusable for a couple of years
How To Apply It?
First, find active mole tunnels to determine the best place to place your traps.
Once you find the active tunnel, you can place the trap.
- Dig a hole until you reach the tunnel.
- The hole should be just slightly larger than the trap.
- Add a mount in the center of the hole.
- Place mounds inside the hole.
- Fill the tunnel entrances with soil.
To Set the Mole Traps:
- Place setting levers on mole traps spring as shown.
- Carefully draw setting levers together. This will require some strength.
- When levers are fully compressed, place the end of the locking bar on the trigger pan. Temporarily set the safety hook around the top of the other mole trap leg.
- Remove setting levers and place mole traps in mole runways.
- Release the safety hook only when the trap is positioned correctly.
What I Like
Safe
This trap is very safe. First, there are no sharp edges, which means you don’t have to worry about pricking yourself when removing or adding products to your list.
It’s easy to get rid of the mole after use.
Easy Setting
Once the trap is on the floor, it is easy to set up.
All you have to do is step on the yellow trigger until it is flush with the trap base.
There is no need to use your hands at any point.
What I Dislike
Extensive Preparation
Compared to other traps, this one requires extensive preparation to get it right. It takes much longer to set up than others.
Not to mention, it needs to be much more precise than the others as well.
Made of Plastic Another big downside is that the Tomcat trap is made of plastic.
Whereas, other models of mole traps are mostly plastic.
This means that this product most likely won’t last as long as some of the other trips on the list.
5. LassoTrap Mole Traps
Pros
Durable build – galvanized steel
Adjustable for small or large moles
Tapered jaw
Easy to use
Reusable – for a lifetime
Weather-resistant
Cons
Interactive to set up and dispose of pest
Goes underground, so it can be hard to track
A bit tricky to set up compared to other traps
Not adjustable for different size moles
Key Details
- Type of Trap: Lasso-type
- Above or underground: Underground
- Materials: Galvanized and oil-hardened spring steel
- How Long Does It Last: With over 100 years of use
How To Apply It?
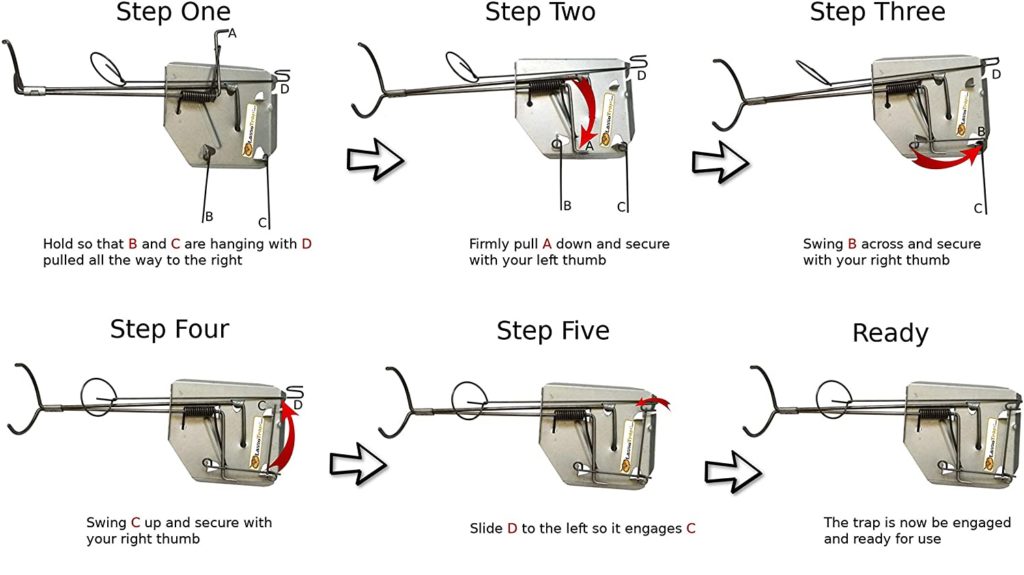
Step 1: Hold so that B and C are hanging with D pulled to the right.
Step 2: Firmly pull A down and secure with your left thumb.
Step 3: Swing B across and secure with your right thumb.
Step 4: Swing C up and secure with your right thumb.
Step 5: Slide D to the left, so it engages C.
Step 6: The trap is now engaged and ready to use.
Placing the Trap
Once you set the trap, it’s time to place the trap in the hole.
- First, you need to find a mole tunnel or hole.
- Next, locate which direction the tunnel is going.
- Next, widen the hole so that the trap can fit inside the tunnel.
- Place the trap inside the tunnel.
- Lightly cover the trap with dirt.
- Check the trap to determine if the trap is set.
You will know once this trap is set because the trigger will be facing upward or on the right side rather than downwards or the left side.
How Does It Work?
This is a lasso type trap.
When the mole enters the tunnel, it will push the trigger until it sets off the trap.
The lasso clamps will then close around the mole, effectively killing it.
What I Like
Small and Compact
One of the great things about this trap is that it’s small and compact. Compared to most other traps, which can be quite bulky and large.
This trap is easy to store and move around.
This lasso trap is small and compact, meaning you don’t need to make a huge hole or damage your garden to set the trap.
Durable
It’s made with galvanized steel for added durability.
After setting this trap, you won’t have to worry about breaking it.
The galvanized steel and weatherproof construction make these traps long-lasting.
What I Dislike
Hard To Set
The thing I dislike about this trap is that it is quite hard to set.
Compared with other traps, there are a lot of moving pieces to this trap.
There are about four different parts that hold down the trap before it gets activated.
Another thing is that the trigger is sometimes not easy to set. The trigger does not consider different sizes of moles.
Not Adjustable
This trap is a bit limiting in terms of the size of the entrance.
The entrance on this trap is quite small, and overall the trap fails to consider different-sized moles.
Also, since you can adjust the size too much if you make a hole that is too large, the mole can tunnel around the trap without getting caught in the trap itself.
6. Humane Tunnel Mole Trap
Pros
Easy to use
Can be separated into segments to clean
Humane – no killing of moles
Cons
Moles don’t always survive
Too small for larger moles
Need to dispose of live moles
Key Details
- Type of Trap: Humane
- Above or underground: Underground
- Materials: Plastic
- How Long Does It Last: More than a year
How To Apply It?
- Find an active tunnel.
- Dig out the tunnel so you can easily spot both the entry and exit point of the tunnel
- Place the trap in the ground horizontally.
- Cover the trap with a thin layer of soil
- Place several moles in different active tunnels you find.
- Can be used with bait.
How Does It Work?
This mole trap works very differently from any other trap on the list.
First, this is not a trigger-activated device.
This trap uses a one-way entrance on both sides that allows moles to enter, but they can’t get out.
Once placed inside the tunnel, moles that get into the tunnel won’t get out.
What I Like
Humane
The best part of this trap is that it is a humane way of getting rid of moles in your yard.
This is one of the only humane traps that can be inserted directly into the tunnel to capture moles.
Easy To Use
This trap is super easy to use.
All you have to do is locate an active mole tunnel.
Once you find the tunnel, you can insert the trap and let it do its magic.
What I Dislike
Need to Dispose of Live Moles
The main issue with this trap is that you need to dispose of the traps appropriately after you capture the moles.
This can be an issue because if not disposed of properly, the moles can find their way back to your home.
Effectiveness
The main issue with this mole trap is that you need to be very careful with the placement for it to be effective.
The trap needs to be snug with the tunnel. It should also have light sand or dirt in front of each entrance to encourage the mole to enter the trap.
If the proper steps are not followed, moles can end up digging under or traveling around the mole trap.